Axolotl Care Guide: Why Your Tank Setup Matters Most
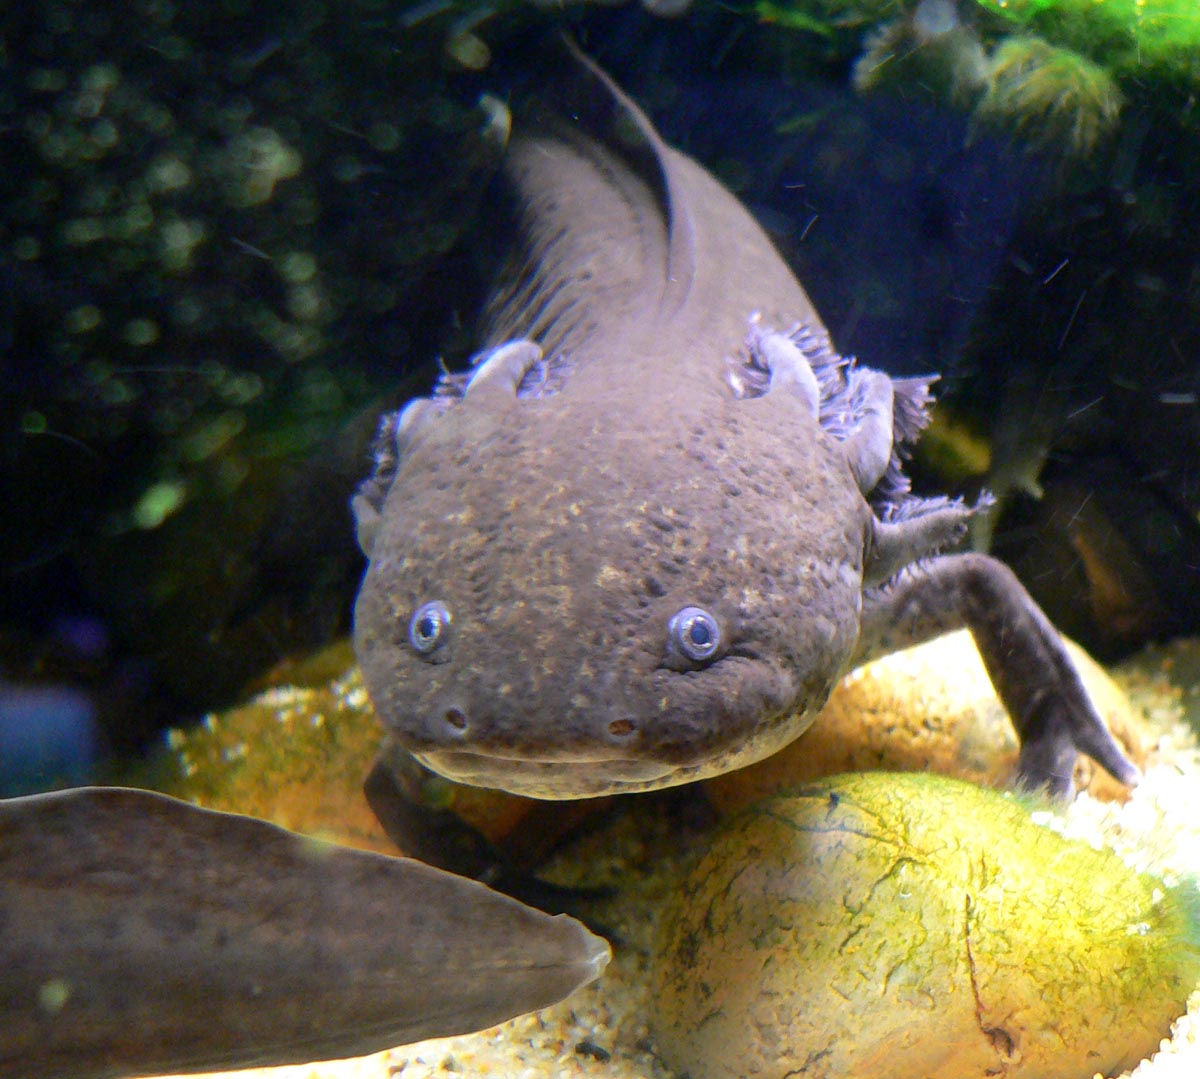
It was 11:23 p.m. on a Tuesday when I noticed my axolotl, Mochi, sitting completely motionless at the bottom of his tank — gills barely moving, skin looking pale in a way it hadn’t the week before. I’d been keeping axolotls for about four years at that point, and something still felt off. I checked the thermometer clipped to the glass: 74°F. That was the problem, right there.
Here’s the thing most beginner guides won’t tell you: the single biggest reason axolotls get sick in captivity has almost nothing to do with what you feed them or how often you clean their tank. It’s the temperature of the water, and it’s almost always too warm. People buy the animal, read that it “needs cool water,” think 72°F is fine, and then wonder why their axolotl is lethargic, losing appetite, or developing fungal patches within a few months. The tank setup — specifically thermal management — is the difference between an axolotl that lives 10 to 15 years and one that barely makes it past year two.
1. Why 60–68°F Is Non-Negotiable (And Most Tanks Run Too Hot)
Axolotls are native to the high-altitude lakes near Mexico City — environments that historically ran cold, year-round. Their bodies are not built to handle sustained temperatures above 72°F. At 74°F, stress responses kick in. At 76°F or above, you’re looking at compromised immune function, increased susceptibility to bacterial and fungal infections, and in prolonged cases, organ stress.
The ideal range is 60–68°F, with 64°F being the sweet spot most experienced keepers aim for. Industry surveys from aquatics hobbyist communities consistently show that water temperature is the most commonly cited factor in axolotl illness — even above water quality issues like ammonia spikes.
The problem in most American homes is that room temperature rarely drops below 68°F indoors, especially in warmer states like Texas, Florida, or Arizona. A standard 20-gallon tank sitting on a shelf in a 72°F apartment is going to reach 70–72°F within days of setup, even without a heater. That’s already borderline dangerous for a long-term keeper.
Solutions that actually work: a dedicated aquarium chiller (brands like JBJ make units sized for tanks up to 30 gallons), placing the tank in a basement where temps naturally run cooler, or using a small fan blowing across the water surface — which can drop temps by 2–4°F through evaporation. I ran a fan-and-chiller combo for two winters before I moved Mochi’s tank to a basement shelf. That basement setup dropped my electricity cost and my stress levels at the same time.
2. Tank Size: 20 Gallons Is the Floor, Not the Goal
You’ll see “20-gallon minimum” cited everywhere, and it’s technically accurate — but it sets a low bar. A single adult axolotl in a 20-gallon tank is workable, but it’s cramped. Axolotls can reach 9 to 12 inches in length as adults, and they’re active explorers at night. A 40-gallon breeder tank gives them actual room to move, reduces waste concentration, and makes temperature stability easier to maintain because there’s more water volume acting as a thermal buffer.
If you’re housing two axolotls — which many people do — don’t go below 40 gallons. Two adults in a 20-gallon tank leads to nipping, stress, and territorial aggression, especially at feeding time. I learned this the hard way when I introduced a second axolotl (a leucistic I named Dumpling) into Mochi’s 20-gallon setup. Within three weeks, Mochi had bitten off part of Dumpling’s gill stalk. Both animals can regenerate tissue — that’s one of the things that makes axolotls remarkable — but that doesn’t mean you should force the situation.
3. Substrate: Sand Over Gravel, Every Time
Gravel is one of the most common substrate choices in general fishkeeping, and it’s one of the worst options for axolotls. They’re bottom feeders that routinely ingest substrate while going after food — and gravel pieces lodge in their digestive tract. It’s not a theoretical risk. It’s a documented, recurring cause of axolotl death in captive settings.
Use fine-grain sand — the kind sold as “play sand” at hardware stores works, as does aquarium-specific sand. If an axolotl accidentally swallows sand, it passes through without issue. Aim for a 1-inch layer across the tank floor, which is enough to give them traction without creating deep anaerobic pockets that trap waste.
Bare-bottom tanks are also an option, and some keepers swear by them for ease of cleaning. The downside is that axolotls have no grip on smooth glass — they’ll slide around, which causes visible stress and wasted energy. If you go bare-bottom, at minimum add flat slate tiles or textured mats to give them footing.
4. Filtration Without Current: The Balance Most Beginners Miss
Axolotls need good filtration — they produce a significant amount of waste for their size — but they hate strong water current. Their feathery external gills aren’t just decorative; they’re delicate, and constant current damages them over time. They’re also slow, methodical swimmers, and fighting a strong flow is exhausting for them.
The fix is a sponge filter or a hang-on-back filter with a spray bar attachment that disperses the outflow along the tank wall rather than blasting it into open water. I use a canister filter with the outlet positioned to push flow along the back glass — it keeps the water moving and oxygenated without creating a current in the center of the tank where Mochi spends most of his time.
Cycle your tank fully before adding any axolotl. This means running the filter for 4–6 weeks with a nitrogen source (fish food, pure ammonia, or a hardy cycling fish) until you’re seeing consistent ammonia and nitrite readings of zero and nitrates below 20 ppm. Skipping the cycle is the second most common mistake after running the tank too warm, and it’s equally preventable.
5. Hides, Plants, and Lighting: Less Is More
Axolotls are crepuscular — most active at dawn and dusk — and they’re sensitive to bright light. A tank that’s blasted with high-intensity LED lighting for 10 hours a day will produce a stressed axolotl that hides constantly and refuses food. That’s not a personality quirk; it’s a welfare signal.
Keep lighting on a timer, 8–10 hours per day maximum. Use low-intensity light if possible, or heavily plant the tank with floating plants like hornwort or java moss — both of which diffuse light naturally and don’t require CO2 injection or strong lighting to thrive.
Hides are non-negotiable. Every axolotl needs at least one cave or enclosed shelter where it can retreat completely from view. Terra cotta pots laid on their side are inexpensive and safe. PVC pipe sections work too. Avoid any decoration with sharp edges or small holes the animal might wedge itself into.
What Doesn’t Work: Four Common Approaches That Hurt More Than Help
1. Feeding only pellets. Axolotl-specific sinking pellets are convenient, and they’re fine as part of the diet, but relying on them exclusively leads to nutritional gaps over time. Rotate in earthworms (nightcrawlers from a bait shop, not from soil treated with pesticides), bloodworms, and occasional small pieces of raw shrimp. Variety matters.
2. Using tap water straight from the faucet without dechlorination. Chlorine and chloramine in municipal water kill beneficial bacteria and stress fish and amphibians. A bottle of water conditioner costs less than $10 and removes both. There’s no good reason to skip this step.
3. “Salting” the tank to treat illness. This is a holdover from freshwater fishkeeping that gets passed around in general aquatics forums. Axolotls are not fish. They’re amphibians with permeable skin, and salt is not a safe treatment for them. For minor fungal infections, a short-duration fridging protocol — temporarily moving the axolotl to a container in the refrigerator at 40–50°F with daily water changes — is far more appropriate and less harmful than salt baths.
4. Housing axolotls with fish. It seems like a fun community tank idea, and yes, axolotls look dramatic. But fish nip at axolotl gills, and axolotls eat fish — or try to, and choke on ones that are too large. There is no safe fish tankmate for an axolotl. The “community axolotl tank” is a myth perpetuated by pet store employees who are trying to sell you more livestock.
A Real Week in the Life: What “Good Setup” Actually Looks Like Day-to-Day
Monday evening: I check the thermometer — 64°F, good. I feed Mochi two nightcrawler segments with tongs. He takes them immediately, which is a reliable health indicator. When an axolotl starts refusing food it’s used to, something’s wrong.
Wednesday: I test the water with a liquid test kit (not the strip tests — they’re notoriously inaccurate). Ammonia: 0. Nitrite: 0. Nitrate: 12 ppm. I do a 20% water change anyway, vacuuming the sand surface with a gravel siphon.
Friday: Mochi is doing his usual late-evening patrol along the back glass. Gills are full and branched out — that’s a sign of good oxygenation and low stress. When axolotls are stressed, their gills flatten back against their body. Full, feathery gills mean things are right.
Saturday: I notice a small amount of algae growing on the front glass. I wipe it off with a magnetic scraper. That’s it. A well-maintained tank with proper lighting schedules doesn’t need much intervention once it’s stable.
The week that didn’t go well: one January, the fan I was using to cool the tank stopped working overnight. By morning, the tank had crept to 71°F. Mochi didn’t eat for four days after that, and I saw the early signs of a gill infection starting. Caught it early, dropped the temp back down, did daily water changes for a week. He recovered fully. But that was a reminder that temperature is never a “set it and forget it” variable — it needs a backup.
Your Next Three Steps This Week
Don’t overhaul everything at once. That’s how people get overwhelmed and either do nothing or panic-buy equipment they don’t need.
Step one: Buy a reliable digital thermometer with a probe — not a stick-on strip thermometer — and check your tank temperature right now. If it’s above 68°F, that’s your most urgent problem, and everything else waits.
Step two: Look at your substrate. If you have gravel, order a bag of fine-grain sand this week and plan a substrate swap for the weekend. It’s a two-hour project that eliminates one of the most preventable causes of axolotl death.
Step three: If you haven’t tested your water with a liquid test kit in the last two weeks, do it today. Ammonia and nitrite readings tell you more about your tank’s health than anything you can see with your eyes — and they give you problems before those problems become emergencies.
Axolotl keeping is genuinely one of the more rewarding things I’ve done in the hobby. They’re strange, prehistoric-looking animals that actually interact with you over time — Mochi presses his front feet against the glass when I walk up to the tank, which I’m aware is probably just a conditioned feeding response, but still. Get the setup right first, and everything else follows.
Publicar comentário